
Introduction to Cluster Lashes
Cluster lashes are a fantastic option for anyone looking to achieve a voluminous lash look without going to a salon. Unlike individual lash extensions that require professional application or strip lashes that can sometimes appear unnatural, cluster lashes offer a beautiful middle ground. They are small groups of lashes bundled together and designed to be applied directly to your natural lashes or lash line. The best part? You can do it yourself at home with a little patience and practice. This guide will walk you through everything you need to know to get started—from what cluster lashes are and how they differ from other lash types, to tips for safe application and removal. Whether you’re preparing for a special event or just want to elevate your everyday makeup routine, mastering cluster lashes can give you salon-quality volume at a fraction of the cost. This DIY option is becoming more and more popular due to its flexibility and budget-friendliness. Even if you’re a complete beginner, don’t worry—by the end of this guide, you’ll feel confident enough to try it yourself. This is not just a how-to manual but also a way to understand the versatility and beauty of cluster lashes. So, let’s explore how to apply, maintain, and wear them like a pro.
What Are Cluster Lashes?
Cluster lashes, sometimes referred to as flare lashes or bouquet lashes, are small groups of lashes that are pre-fanned and glued together at the base. They come in various lengths, thicknesses, and curls to help you achieve your desired look, whether it’s natural or ultra-dramatic. Unlike strip lashes, which cover the entire lash line, clusters are designed to be applied in sections, allowing for a more customized appearance. Some cluster lashes are designed for single-day wear, while others—when used with semi-permanent adhesives—can last several days. The main benefit of cluster lashes is the added volume and density they bring, without requiring the time or skill of individual lash extensions. They also don’t require a trip to the salon, which makes them ideal for DIY lash enthusiasts. You can apply just a few clusters for a soft enhancement or go full glam by stacking them across the lash line. Another advantage is that they’re easier to handle than individual lashes because you’re working with small groups rather than single strands. They are widely available in beauty supply stores and online retailers, with different materials such as synthetic, silk, and mink. Learning to use cluster lashes opens the door to many beauty possibilities. They are perfect for beginners who want to experiment without committing to longer-lasting extensions. With a little practice, you can create a professional look from the comfort of your home. If you’re unsure about lash glue or placement techniques, don’t worry—we’ll cover all of that in this guide. For now, understand that cluster lashes are your go-to option for affordable, accessible, and customizable lash volume.
Tools and Products You’ll Need
Before diving into the application process, it’s essential to gather the right tools and products. First on your list should be a good set of cluster lashes. Opt for high-quality lashes made from silk or faux mink for a natural appearance. Next, you’ll need lash adhesive. For short-term wear, a regular latex-based lash glue works perfectly. If you want the lashes to last longer, consider using a semi-permanent adhesive designed specifically for cluster lashes. You’ll also need a pair of tweezers—preferably angled or curved—to help you grip and place the clusters precisely. A small mirror and good lighting are key, especially if you’re applying the lashes to yourself. Lash scissors can come in handy if you need to trim the clusters to match your lash line. Some users also prefer using a lash applicator tool, which can simplify the process for beginners. Cotton swabs and micellar water are useful for cleaning up excess glue or fixing placement mistakes. A lash spoolie is great for brushing through your natural and false lashes to blend them together. Another optional but helpful product is a lash sealant, which can be applied after the glue has dried to protect and extend the wear time of your lashes. Be sure to wash your hands before starting the process and have a clean, dry surface to lay out your supplies. Having everything organized and within reach can make a big difference in your DIY experience. It reduces stress and increases your chance of achieving a flawless, salon-worthy look. With your tools ready, you’re now set to begin the exciting part—application.
Preparing Your Natural Lashes
Before applying cluster lashes, proper preparation of your natural lashes is crucial for a secure and lasting hold. Start by removing any eye makeup, especially mascara or eyeliner, with an oil-free makeup remover or micellar water. Oils can interfere with the adhesion of the lash glue, leading to poor retention. After cleansing, make sure your lashes are completely dry. Using a clean spoolie brush, gently comb through your lashes to remove any tangles or debris. If your natural lashes tend to be straight or point downward, consider curling them slightly with a lash curler to help the clusters blend better. However, avoid applying mascara before putting on cluster lashes—it can make the lashes clumpy and reduce the effectiveness of the glue. At this point, it’s also helpful to assess the shape and size of your eyes to plan your lash placement. Do you want a cat-eye effect with longer lashes on the outer corners, or a more rounded look with even lengths across the lid? Decide before you begin. Setting up a comfortable workspace is equally important. Use a magnifying mirror if you have one, and make sure your seating allows you to rest your elbow for steadier hands. Preparation isn’t just about cleaning your lashes—it’s about mentally and physically getting ready for precise work. Taking a few minutes to prep correctly will save you frustration and lead to a more seamless application. Once your lashes are clean, dry, and brushed out, and your tools are within easy reach, you’re ready to move on to the application stage.
Applying Cluster Lashes Step-by-Step
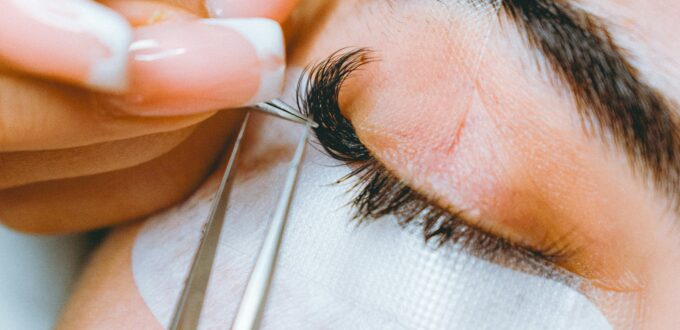
Application may seem daunting at first, but with a step-by-step approach, you’ll get the hang of it quickly. Begin by carefully removing a cluster from its tray using tweezers. Dip the base of the cluster into a small amount of glue, then wait a few seconds for the adhesive to become tacky. This step is essential—it prevents the lashes from sliding around and helps them adhere more quickly. Looking downward into a mirror, gently place the cluster slightly above your natural lash line, not directly on the skin but close enough to blend naturally. Start from the center of your lash line, then work your way outward and inward. Give each cluster a few seconds to set before applying the next one. Avoid placing clusters too close together, which can cause them to clump or feel heavy. As you progress, use a lash spoolie or tweezers to adjust the angles so each cluster fans out in the desired direction. If a cluster isn’t sitting correctly, carefully remove and reposition it before the glue sets completely. Don’t rush—precision is key. Once all clusters are in place, give the lashes a few minutes to fully dry. You can gently pinch them together with tweezers or your fingers to help blend them into your natural lashes. If desired, apply a coat of sealant to reinforce the adhesive and improve longevity. Practice makes perfect, so don’t worry if your first few attempts aren’t flawless. With time, you’ll develop a rhythm and technique that works best for you.
Styling Your Lash Look
Once you’ve mastered the application, it’s time to play with different styling techniques to enhance your lash look. Cluster lashes offer a lot of creative freedom. Want a natural, wispy effect? Use shorter clusters with spacing in between and stick to lengths that match your natural lashes. For a dramatic, night-out appearance, go bold with longer and denser clusters applied across the entire lash line. The placement of the clusters makes a big difference—placing longer clusters on the outer corners can give a sultry cat-eye look, while evenly distributed clusters create a round, doll-eyed effect. You can also layer two clusters in certain areas for extra dimension. Customization doesn’t stop there—different curls and thicknesses offer further styling possibilities. A “C” curl gives a gentle lift, while a “D” curl delivers a more glamorous swoop. Some beauty lovers even combine cluster lashes with a touch of mascara at the tips to intensify the color and shape, though this can reduce their wear time. Accessories like eyeliner can also be used to conceal any visible lash bands and define the eyes further. Avoid using oil-based products near your eyes, as they can break down the glue. Lastly, don’t forget that styling isn’t just about appearance—it’s about comfort, too. Choose lengths and densities that feel light and wearable for your lifestyle. With cluster lashes, you can achieve salon-level drama or everyday elegance from the comfort of your home.
How to Make Cluster Lashes Last Longer
To extend the wear of your cluster lashes, proper aftercare is essential. First, avoid getting your lashes wet for at least 24 hours after application. This allows the glue to fully cure and bond to your natural lashes. Stay away from steam, hot showers, and saunas during this period. When cleaning your face, be careful around the eye area—use a damp cotton pad to gently wipe around the lashes. Oil-free makeup remover is your best friend, as oil-based products can weaken the adhesive and cause early fallout. Avoid rubbing, tugging, or sleeping face-down, as these actions can dislodge the clusters. If you want the lashes to stay intact for multiple days, consider applying a lash sealant after the glue dries. This adds an extra layer of protection against moisture and debris. Brushing the lashes gently with a spoolie each morning can help maintain their shape and remove any dust or particles. Don’t apply mascara on top of cluster lashes if you plan to reuse them or extend their wear. Mascara can make removal messy and damage both your natural lashes and the clusters. If a cluster begins to lift, resist the urge to glue it back down unless you’ve cleaned the area first—adding glue on top of old glue can lead to clumping and irritation. By incorporating these habits into your daily routine, you’ll enjoy fuller lashes for longer periods without compromising on comfort or appearance.
Removing Cluster Lashes Safely
Removing cluster lashes safely is just as important as applying them correctly. Improper removal can damage your natural lashes and cause irritation. The first step is to avoid pulling them off dry. This can lead to lash loss and pain. Instead, use a lash remover or oil-based cleanser to loosen the adhesive. Apply a generous amount using a cotton swab or pad, and let it sit for a few minutes. Gently massage the area to help dissolve the glue. Once the clusters begin to loosen, use tweezers or your fingers to carefully slide them off, starting from the outer corner. Take your time—rushing this step can lead to unnecessary damage. After removing all the clusters, use a clean pad with micellar water or cleanser to wipe away any remaining residue. Give your natural lashes a break if they feel dry or fragile. Apply a lash serum or conditioning oil, like castor oil, to nourish and strengthen them. Avoid reapplying cluster lashes immediately if your lash line is sore or irritated. Instead, allow at least a day or two of recovery time. If you plan to reuse the clusters, clean them by soaking the base in a gentle makeup remover and removing any dried glue with tweezers. Let them dry completely before storing them in a clean container. Practicing safe removal ensures the health of your natural lashes and keeps your eye area comfortable and clean. With the right technique, taking off your cluster lashes can be quick, gentle, and effective.
Common Mistakes and How to Avoid Them
Even experienced beauty lovers can run into trouble with cluster lashes. One common mistake is using too much glue. While it might seem like more glue means better hold, it often causes clumping and makes the lashes harder to apply. Always use a small amount and let it get tacky before placement. Another issue is applying clusters too close to the inner corners, which can lead to discomfort and a heavy feeling. Stay slightly away from this area to maintain comfort and avoid eye irritation. Improper placement is another pitfall. If clusters are applied too high or too far from the lash line, they’ll look unnatural and might not blend well. Use a mirror angled below your face so you can see your lash line clearly during application. Rushing the process can also lead to poor results. Take your time, especially when you’re new. Practice on weekends or evenings when you’re not in a hurry. Skipping lash prep is another big mistake—dirty or oily lashes will make it harder for the glue to stick, and the clusters may fall off quickly. Lastly, not following proper removal techniques can cause damage. Never yank off the clusters. Use remover or oil-based cleansers to dissolve the glue first. Learning from these common missteps will improve your lash application and help you achieve better, longer-lasting results. With care and attention, you’ll avoid these beginner blunders and perfect your DIY lash game in no time.
Final Thoughts: Confidence Through Lashes
Cluster lashes offer a fun, flexible way to experiment with your beauty routine while enhancing your confidence. Whether you’re aiming for a soft daytime look or full evening glamour, these lashes give you the power to customize your style without the high cost or time commitment of salon visits. They’re beginner-friendly, easy to apply with a little practice, and totally DIY-approved. As you become more comfortable with application and styling, you’ll discover how empowering it feels to create your own beauty look. The boost in confidence from a set of well-applied lashes is real—it’s like finishing a great outfit with the perfect accessory. Cluster lashes can highlight your natural features, open up your eyes, and add just the right amount of drama. Plus, they’re perfect for special events, photoshoots, or everyday elegance. With this guide, you’re equipped with everything you need to get started—from choosing the right products to applying, maintaining, and removing them safely. Like any beauty skill, it takes patience and practice, but the payoff is worth it. Cluster lashes are a small but impactful change that can elevate your entire look. So gather your tools, carve out some time, and give it a try. You might just find that your new favorite beauty ritual is one you can do right at home.
No Comments Yet